How to Make Slax Your Ultimate Portable PC
Posted on Sat 04 March 2023 in general

If you search the internet, you'll find a ton of information about portable Linux distros such as Slax. But most articles just give a list of what's out there and popular without taking the time to explain how to set them up - and believe me, the set up process for some of these distros can be far from simple.
Portable Linux distros are any distro that's designed to run from a USB stick or external drive, without being installed. These are a bit different to the typical Linux LiveCDs used to install / preview Linux distributions. As a daily driver of Pop! OS and a huge advocate of using the technology that works for your use case, I think there's a few reasons you might be interested in portable Linux distributions:
-
You don't own or don't want to carry around a laptop - maybe you're a backpacker, maybe you live out of internet cafes, maybe you just travel a bunch.
-
You're interested in being able to use any hardware and still have a reliable, known environment.
-
You want to have an OS that you can use for debugging other devices or Linux installs.
-
You have old hardware and want to revive it without committing to using it permanently.
In my case, it's a combination of these: my daily driver Pop! OS install offers a lot of opportunities to get distracted by messaging and I travel around quite a lot, so having to carry the daily driver whenever I go out can be annoying. I also have an old ASUS laptop without a storage drive which is a prime candidate to run a portable OS from a drive. My goals with this install were to make a USB stick I could plug into most computers and do productive work with minimal downtime. The USB stick I'm using for this is only 16GB, so any setup had to also be fairly lightweight.
Why Slax? Slax is minimal and Debian-based, which means it uses familiar tools and comes with only very basic apps by default. This contrasts with other popular portable distros such as Puppy Linux, which is an older portable distro and comes pre-loaded with more niche apps, or Porteus, which is based on the older Slackware distribution of Slax. Unfortunately, even most Linux users aren't as familiar with Slackware distributions, so the minimal Debian distribution is likely to work for the majority of users with some Linux experience.
Preparing to Install (from Linux)
I'm writing under the assumption you're already using Linux, because I assume most people who want to use portable distributions have already tried it. If you're installing from Windows some of these steps (like dealing with filesystem permissions) won't be relevant to you.
If you visit the official Slax website you'll get a pretty decent setup guide. Unfortunately, this guide doesn't really cover certain difficulties you might have. In any case, our first step is to download the Slax ISO.
My daily driver doesn't support booting from non-FAT32 partitions, so I had to format my USB stick to this in order to get the BIOS to recognise the USB stick as a bootable drive. FAT32 is also the most widely supported filesystem on most hardware, so for a portable distro like Slax it makes sense to format your drive this way. However, there's a couple of problems with using FAT on Linux.
-
FAT isn't POSIX-compliant. This means that Slax itself will complain loudly about being installed on a FAT drive and will need to store its data in files rather than directly on your USB drive. However, this isn't that big a deal; Slax handles saving its data to files pretty handily. The only real consequence of this are you have to wait for data to finish writing whenever you make changes and you can't store single files bigger than 4GB (why would you need to on a portable distro?) The much bigger problem is...
-
FAT doesn't have support for filesystem permissions. This means that by default it'll be mounted as a read-only filesystem, making it impossible to load the Slax files onto the USB stick.
Luckily the filesystem permission problem is easily overcome with a couple of tweaks to our fstab file, which I'll share later.
For now, just format your whole USB stick with a single FAT32 partition using whatever software you prefer. Do not try to load the Slax ISO directly onto the USB stick - by default, Slax acts as a CD-ROM, which means you can't edit anything once it's burned.
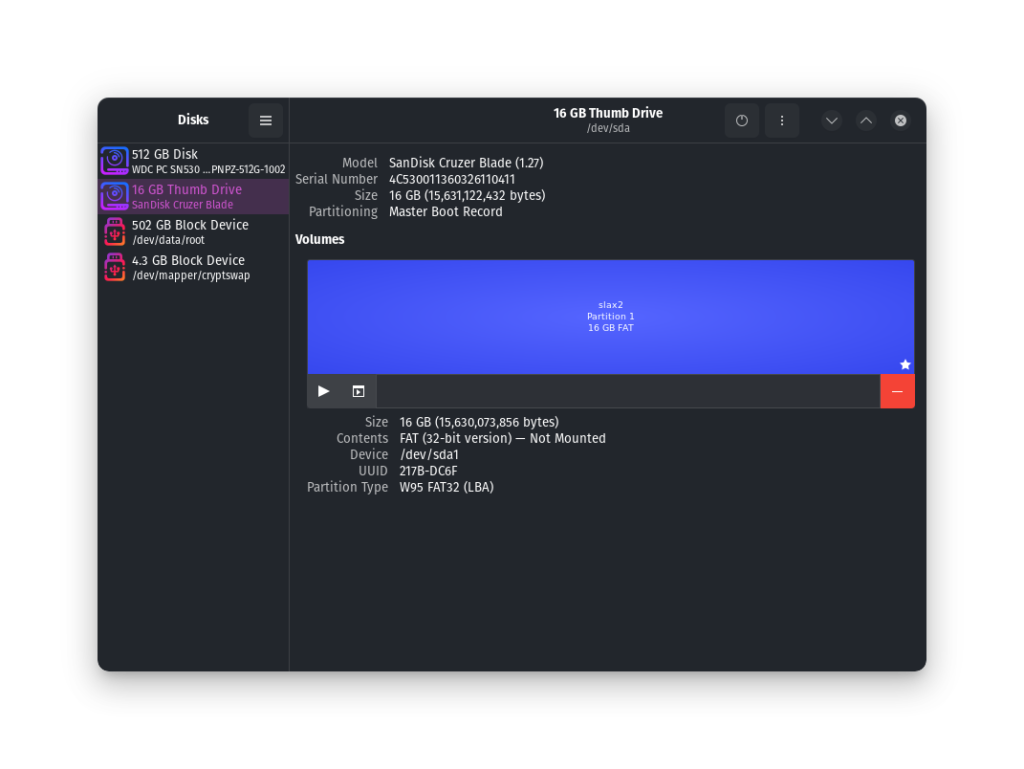
On most Linux distros, your FAT32 partition will be immediately detected. However, it won't be writable. This is because FAT32 has no concept of permissions, so the permissions of the drive are decided by your Linux distribution when you mount the USB stick. The easiest way to deal with this is to edit your /etc/fstab file to allow writing and execution to the device. You just need to add one line to your fstab file. Depending on exactly how you want to set it up, your exact line will vary but will look something like this:
LABEL=slax /mnt/slax auto nosuid,nodev,nofail,noauto,x-gvfs-show,exec,dmask=000,fmask=000 0 0
The important parts are the exec, dmask, and fmask options. These allow you to execute programs on the filesystem, edit directories, and edit files respectively. For more info on fstab formatting see the fstab manual.
Now we can finally follow the official guide. First, mount the Slax iso somehow. I simply used GNOME's built in Disk Image Mounter utility. You should see the main slax folder and the readme.
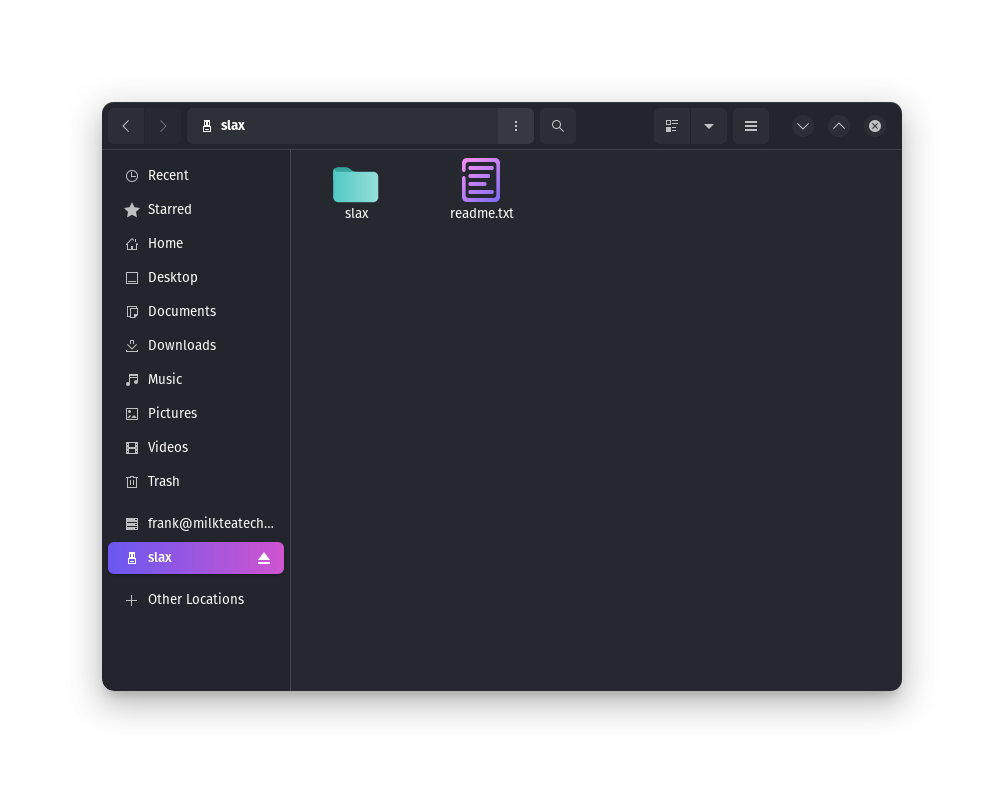
Next, copy the entire slax folder to your USB drive, then, open up the /slax/boot/ folder from the USB drive in your terminal and execute bootinst.sh. You might need to use sudo for this.
sudo ./bootinst.sh
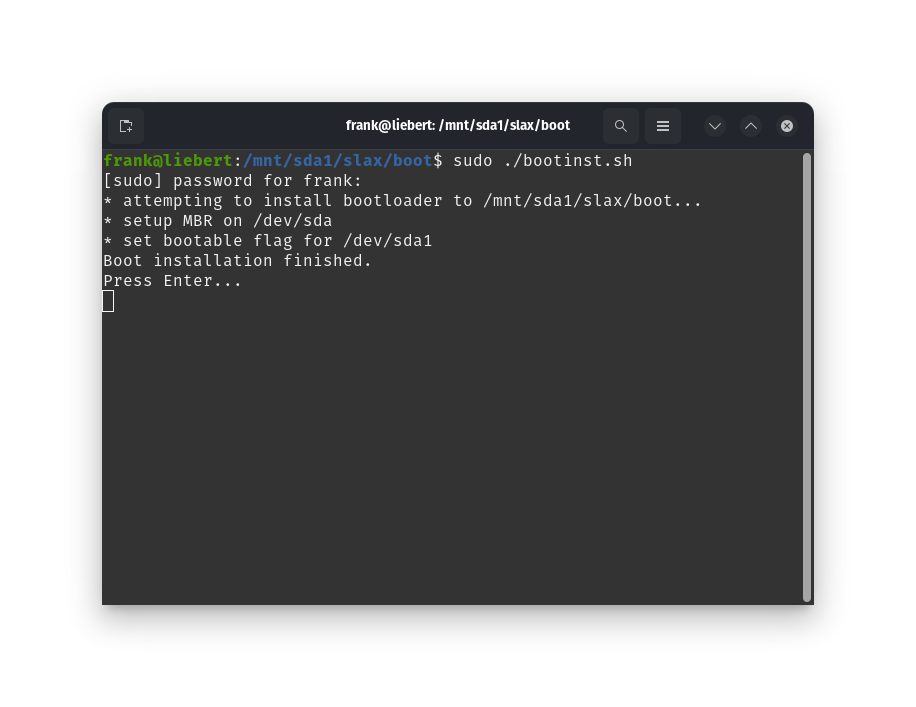
Now we have a valid slax install!
Booting Into Slax
Assuming you want to use Slax on the same device you used to flash the USB stick, the next step is to restart your computer and open up your BIOS. Make sure that Secure Boot and probably also Fast Boot are disabled (I found the former blocked Slax from loading, but the latter has no real impact on my hardware). From there you should be able to select the USB stick you just set up as boot media, and you'll be greeted with the Slax boot screen:
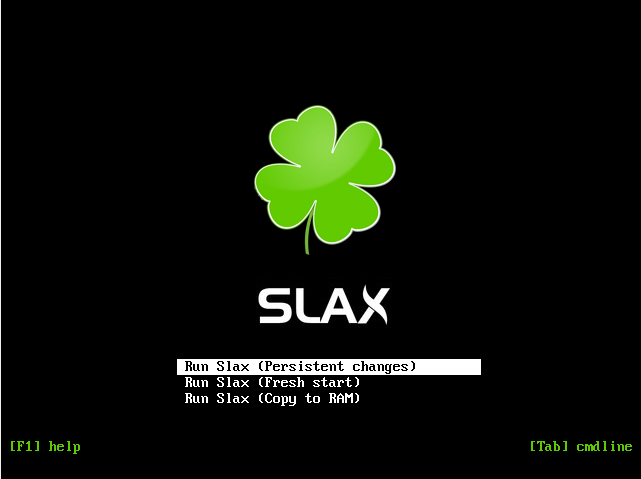
You have a couple of options here. You can use the 'Fresh Start' option, which gives you a totally static install with no files saved to disk. However, this is a bit harder to use as it requires you to manually save any changes you make to modules (I may write another article about this later). Assuming you chose to boot with persistent changes, you just need to wait a little while and you should be greeted with the Slax desktop.
If your boot freezes before getting into the desktop you might need to modify the GRUB boot options. You can do this either by pressing tab at the Slax bootscreen or by modifying sysconfig.cfg in your USB's boot folder. The most likely issue is with acpi, so you can change the APPEND lines of your boot options to address this:
APPEND vga=normal initrd=/slax/boot/initrfs.img load_ramdisk=1 prompt_ramdisk=0 rw printk.time=0 consoleblank=0 slax.flags=automount acpi=off
Making Slax Fun
Here's our current Slax setup:

You may notice it's looking a bit... plain right now. First, it's running in VGA mode 640x480. Second, it's running a very minimal window manager as its desktop environment. However, neither of these are hard limitations of Slax, just defaults designed to get you up and running with minimal overhead for your device. You might need a wired internet connection for this part, either via USB adapter or ethernet port on your device.
Get Up To Date
Some of the default behaviours of Slax can be a bit strange. For example, when it shuts down it might not actually power off your device. Luckily, this issue seems to have already been patched; we can update our packages in the normal way for Debian. Open a terminal and write the following:
apt update
apt upgrade
Wait for the update to finish, then restart and you should have better firmware on Slax.
Get the Basics
Slax comes with AMD, Nvidia, and Intel graphics drivers from the stable release of Debian preinstalled. These might be a bit dated, but they should work just fine. However, it doesn't necessarily use them. On my device this was the main reason I was locked to the default 640x480 resolution. In order to get them to actually work, you'll likely need to install the firmware-linux Debian package. Crack open a terminal to do this:
apt install firmware-linux
It might be worth restarting after this step just to make sure it worked.
Assuming you're on modern hardware, you probably want to be able to use bluetooth. The easiest way I found to do this was to install two packages: bluez, the default Linux bluetooth service, and blueman, a GUI for managing your bluetooth connections. These will give you both an easy interface and a more advanced and reliable interface for connecting to your bluetooth devices.
apt install bluez blueman
systemctl enable bluetooth.service
Finally, you likely want a proper interface for wireless networks. Unfortunately I only got this working on my older devices as my newer laptop appears to have a wifi card that's not yet supported by Debian stable. However, good old network-manager will provide us with a good-enough graphical interface
Restart your computer up again. This time it should load the bluetooth service by default.
Finally, we probably want a friendlier text editor than the default vi for tweaking our system. If you're familar with terminal editors, install whatever you prefer: I chose micro as it's easy to use.
apt install micro
Optionally, you can install any terminal emulator you prefer. I like tilix for its easy-to-use GUI.
apt install tilix
Get A Proper Desktop
By default, Slax uses the fluxbox window manager as its desktop environment. This is great for very low-end hardware and for making the burden on the USB stick we're using as low as possible, but if you're used to conventional desktop environments it might feel a bit too minimal.
The first step is to choose what desktop environment you want. As always, choose based on your use case and preferences. As a rough guide:
-
GNOME (package gnome-core) if you want a slick Mac-style environment and don't care about disk usage
-
KDE Plasma (package kde-plasma-desktop) if you want a very customisable desktop and don't care about disk usage
-
Cinnamon (package cinnamon-core) if you want a more Windows-like environment and don't care about disk usage
-
MATE (package mate-desktop-environment-core) if you want a lighter Windows-like experience
-
XFCE (package xfce4) if you want a lightweight desktop without too much fuss
-
LXDE (package lxde) if you want the lightest possible desktop short of a window manager
(If you're a hardcore window manager enthusiast you likely don't need my help.)
Despite being a massive GNOME fan, I selected XFCE for my setup because my USB stick is only 16GB, and even the base install of GNOME is 1GB. XFCE is much lighter and should run on a variety of hardware with little issue. There are two steps you need to take to setup your desktop: first, install the package you want above:
apt install YOUR_DESKTOP_HERE
If you restart now, you'll notice you still boot into the same old fluxbox environment. This is because slax, being a lightweight distro, doesn't ship with a login screen by default. Luckily it's easy to change our desktop environment manually. Open up a terminal and type in:
micro ~/.xinitrc
xinitrc is the first thing that the x display server calls when it opens; in slax it's used to control the desktop environment we boot into.
startfluxbox
All we need to do is change this line to the appropriate command to start our desktop environment:
startxfce4
Finally, restart your computer and enjoy your new desktop environment!
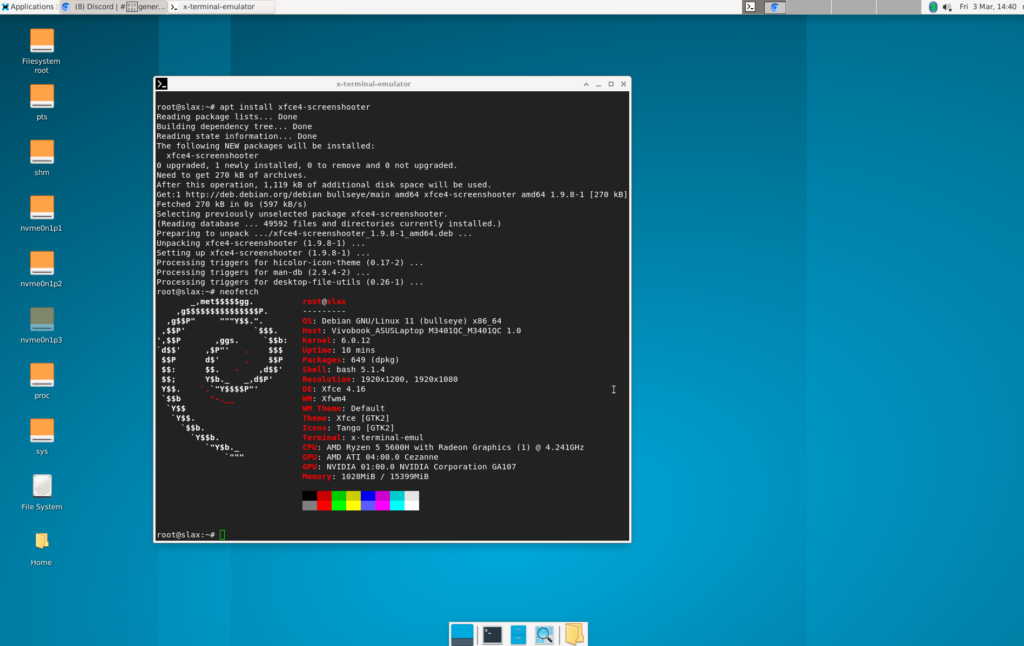
Ain't she a beaut?
From here, the world is your oyster. We've set up a desktop environment that's almost identical to a typical Linux desktop install, except it runs off a simple USB stick. You can try running your new 'computer' on any available devices just by plugging them in and using the BIOS to boot from USB stick.
Have fun, and enjoy being able to carry your new computer in your pocket!