Hosting Comments for this Blog: An Isso Adventure
Posted on Sun 15 March 2026 in general

(To skip my narration and jump to the setup part, click here.)
As you might have noticed, fd93.me has comments now!
Specifically, comments powered by isso. In this article, I want to talk about the various decisions and technical steps that led me to the current setup. While this article focuses on isso, the same steps apply for hosting most web services on a VPS.
For most of the services I host I just use my home server (a Raspberry Pi 4 8gb). In this case, though, I didn't want to host isso on my own hardware because it needs to talk to the public internet, and I was not interested in exposing my home network to the tender mercies of the internet in 2026.
Instead, I had to figure out a cloud-based solution. For a long time, I've avoided embedding much compute in this site because it adds complexity and ongoing cost. I worked around this with IFTTT when I created the site, but using webhooks for everything wasn't very sustainable.
Embedding comments in the site solves some problems with just posting on Mastodon or other socials:
- According to analytics, the majority of my readers come from search engines, especially on the how-to articles.
- Social posts disappear in a week (at most), but I try to write so-called 'evergreen' content which will still be relevant in a year or two.
- Social embeds force people to join the same platform as me. I like Mastodon, but it seems a bit much to expect someone to jump from duckduckgo to my blog post to joining a Mastodon instance just to tell me about an article.
I had a few requirements for my solution, but I was willing to bend any of them if necessary:
- It should be cheap to run, where cheap is defined as under $10 / month. I don't make money from this blog and prefer to keep any ongoing costs as low as possible.
- It should use a European provider, preferably one located in a country with laws that go beyond the minimum required by GDPR. While this is a comment system and inherently public data, I don't fully trust US providers not to mirror all my traffic data to some data collection scheme. Meanwhile, Asian countries seem to have extremely thin privacy and data security laws.
- It should be relatively simple to understand and bugfix; preferably it should be self-healing.
The AWS Designs
(This section discusses solutions I didn't use. If you're not interested in system design, skip to the next section.)
I'd wondered about how you could efficiently host Isso on AWS for a while, and came up with several different designs. To keep it very brief, they were:
- Just use a single EC2 instance to host Isso and keep backups.
- Use ECS to provision EC2 instances and make Isso self-healing. Use a load balancer to deal with instances being terminated.
- Use AWS Lambda to host Isso, attach it to persistent storage, and proxy it through API gateway and cloudformation.
In the end, all AWS-based designs were a pretty major compromise on my 'European providers only' requirement, which made me uncomfortable. I was still willing to be morally flexible for the right price.
But AWS did not meet my cost requirements either. A simple solution using a single EC2 instance would have had predictable costs of around $4 a month, but no ability to scale in (i.e. cut costs) and little resilience to failure. Also, the instance I would get for this price (t4g.nano) is seriously underpowered at 500mb of RAM. It also has an ARM processor, which can limit compatibility with some compiled software.
The more resilient ECS-based solution would tolerate failure better and let me take advantage of spot instances to lower compute cost. Unfortunately, those cost savings are immediately destroyed by paying $15 / month for the load balancer needed to implement ECS.
The more complex solution using lambdas could have scaled in to less than $1 / month in costs, but in theory could also have scaled out to infinite costs.
The final nail in the coffin for AWS was the complexity of the ECS / Lambda solutions, which would have made them harder to maintain. They also use proprietary AWS components, which makes it far harder to migrate off them. In fact, considering AWS-based solutions made it obvious I'd missed a requirement:
- Where possible, the solution should avoid vendor lock-in.
If you are interested in a more in-depth look at each of these designs, let me know in the comments and I will write a full article.
Hetzner: Da steppt der Bär (the party's there)
In the end I went with Hetzner for hosting. Why?
- For the same price as a t4g.micro with 500mb of RAM, I can get an instance with 2gb on Hetzner. This will be nice if I want to put more than one service on the server.
- They are based in Germany, which meets my requirement of keeping data in Europe. Not only that, Germany supplements the GDPR with additional, stricter regulation.
- They mainly provide plain VPS instances without much fancy additional infrastructure, which keeps my solution simple.
I went with a simple VPS server with backups and an IPv4 address, costing just under 5 EUR a month. Although resilience is convenient, this is just a comment service for my personal blog. Even if it's down for a week, it doesn't really matter, and some basic observability can fill in the gap. A simple VPS setup also has a mostly fixed cost, regardless of traffic; if you get more traffic than the server can handle, it just fails. For me a bit of downtime is better than blowing hundreds of dollars on a scaling solution.
Hetzner offers a few operating system options. I chose Fedora Linux. It's what I currently run at home, and at work I usually use RHEL variants, which are Fedora-based.
Setting Up Isso
By default Hetzner's distribution of Fedora signs you in as the root user. Running services as root is usually a bad idea, and Isso's install guide specifically advises against it, so the first thing I did was set up a new user, switch to it and create a virtual environment for Isso:
adduser --home-dir /home/isso --create-home --user-group isso
su isso
cd
# All isso runtime files will live inside /home/isso for ease of management.
virtualenv --download /home/isso/isso
Next I needed some setup tools so that isso could be installed from pypi:
exit # back to root user
yum install python3-devel python3-virtualenv sqlite
yum groupinstall "Development Tools"
The groupinstall command didn't work, so I ignored it and moved on. This
turned out to be a mistake, as we'll see in a moment. Finally I tried to install
isso:
su isso
cd
source /home/isso/isso/bin/activate
pip install isso
This failed with an 'unable to build wheels, missing gcc' error. After digging
into the package names and commands for dnf5, for which both normal Google
search and AI search were quite useless, I figured out that the correct commands
to install development tools for Fedora 43 (and any recent distro which uses
dnf5) were as follows:
dnf5 install python3-devel python3-virtualenv sqlite
dnf5 group install development-tools
Since I figured other people might have the same problem, I filed a PR to update Isso's installation docs.

This finally allowed isso to build and install. Next, I setup my isso config in
/home/isso/isso.cfg. It looked like this:
[general]
dbpath = /home/isso/comments.db
host = https://fd93.me/
gravatar = true
log-file = /home/isso/isso.log
[server]
listen = http://0.0.0.0:8080
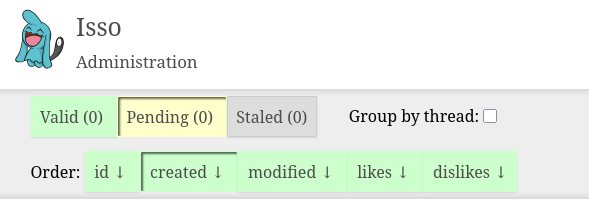
[moderation]
enabled = true
[rss]
base = https://fd93.me
[admin]
enabled = true
password = REDACTED
I enabled moderation queue because in my past experience, blog comments sections
are a spam magnet. I also enabled RSS because I know at least a few of my
readers use RSS as their primary method of following articles and comment
chains. I did NOT enable SMTP (outbound emails) because my Hetzner account is
new and therefore not allowed to send outbound mail. Since this was just for
testing I bound to the public interface http://0.0.0.0:8080.
(For more information on how to configure an isso server see the docs.)
After all that, I was finally ready to test drive isso:
/home/isso/isso/bin/isso -c /home/isso/isso.cfg
Disappointment:
no module named 'pkg_resources' found
I had to dig around a bit, but it turned out this was due to setuptools being removed from Python 3.12 and greater. You have to install it manually:
pip install setuptools
/home/isso/isso/bin/isso -c /home/isso/isso.cfg
Tried again, and:
no module named 'pkg_resources' found
After expressing myself colorfully at the computer screen, I did a bit more
research. Turns out that pkg_resources
is no longer part of setuptools >= 82.0,
and the latest version of setuptools at time of writing is 82.0.0. There are
proper fixes to this, but by this point I was slightly tilted, so I just
downgraded:
pip install setuptools<82.0
nohup /home/isso/isso/bin/isso -c /home/isso/isso.cfg &
This time it worked, and just in time for me to notice this line from the isso docs:
Binding to a public interface is not recommended.
Looked like it was finally time to do things properly.
Going to production
Having read the dire warnings against serving Isso on a public interface, I
immediately removed the [server] section from my config and restarted the
server:
# who knows what the actual process number was
kill $PROCESS
su isso
nohup /home/isso/isso/bin/isso -c /home/isso/isso.cfg &
In order to serve isso without binding it to a public interface (and serve HTTPS), I needed to setup a web server as a reverse proxy. The isso guide recommends nginx, but I'm too lazy to bother with configuring that, so instead I went with caddy. Caddy has two nice features for self-hosting:
- It has very succinct and readable config files
- It automatically sets up and renews free Let's Encrypt certificates
Back as root, and having installed neovim in the meantime:
dnf copr enable @caddy/caddy
dnf install caddy
nvim /etc/caddy/Caddyfile
This is my Caddyfile, which is rather laconic. It forwards inbound traffic from
comments.fd93.me to localhost:8080.
comments.fd93.me
  reverse_proxy :8080
Let's start the systemd unit for Caddy and see what it says:
systemctl start caddy.service
systemctl status caddy
DNS problem: NXDOMAIN looking up A for comments.fd93.me. Great.
Unlike the various difficulties in the isso setup, this was a predictable skill
issue, so I calmly went to my DNS provider (AWS Route 53), setup an A record
from comments.fd93.me to the VPS, waited a minute for the change to propagate,
and tried again.
systemctl start caddy.service
systemctl status caddy
# It works! Make the service start on boot.
systemctl enable caddy.service
Now I had TLS and a proper reverse proxy in place. But wait! Isso is still just running as a background process, and will be killed on reboot. Also, I was still running it on its development server, which is not recommended in the docs.
Luckily Isso's maintainer provides a handy systemd unit for isso. I tried configuring gunicorn to serve isso, but didn't have much luck. So instead I went with gevent, which is a simpler setup:
su isso
source /home/isso/isso/bin/activate
pip install gevent
I then added the following modified systemd unit file at
/etc/systemd/system/isso.service:
[Unit]
Description=isso commenting system
Documentation=man:isso(8)

# Require the filesystems containing the following directories to be mounted
RequiresMountsFor=/home/isso

ConditionPathIsDirectory=/home/isso
ConditionPathIsReadWrite=/home/isso

# Start only if there are conf files in isso home - otherwise
# skip this unit quietly.
ConditionPathExistsGlob=/home/isso/*.cfg

[Service]
ExecStart=isso -c /home/isso/isso.cfg

#UMask=0007
Restart=on-failure
TimeoutSec=1
User=isso

LimitNOFILE=16384
LimitNPROC=16384
LimitLOCKS=16384

# ensures that the service process and all its children can never gain new
# privileges.
NoNewPrivileges=true

[Install]
WantedBy=multi-user.targe[Unit]
Description=isso commenting system
Documentation=man:isso(8)

# Require the filesystems containing the following directories to be mounted
RequiresMountsFor=/home/isso

ConditionPathIsDirectory=/home/isso
ConditionPathIsReadWrite=/home/isso

# Start only if there are conf files in isso home - otherwise
# skip this unit quietly.
ConditionPathExistsGlob=/home/isso/*.cfg

[Service]
ExecStart=isso -c /home/isso/isso.cfg

#UMask=0007
Restart=on-failure
TimeoutSec=1
User=isso

LimitNOFILE=16384
LimitNPROC=16384
LimitLOCKS=16384

# ensures that the service process and all its children can never gain new
# privileges.
NoNewPrivileges=true

[Install]
WantedBy=multi-user.target
To make this work I had to have isso available in root's PATH, which I managed with a symlink:
ln -s /home/isso/isso/bin/isso /usr/local/bin/isso
Finally, I was ready to run isso in a relatively production-ready way:
# This reloads the systemd unit files
# so systemctl is aware of the latest versions
daemon-reload
systemctl start isso.service
It ran!
I decided to reboot the server to see if my setup was robust:
systemctl reboot
On reboot, there was no sign of isso. Pop quiz: why?
Yet another skill issue. I'd forgotten to enable the systemd unit:
systemctl start isso.service
systemctl enable isso.service
systemctl reboot
This time, the service ran as expected on reboot. Nearly finished, but now it needed embedding in the blog.
Embedding in the blog
In theory, the final step to insert Isso into a blog should have been easy; just add the embed code to the bottom of my article template and update the site:
<script
  data-isso="//comments.fd93.me/"
  src="//comments.fd93.me/js/embed.min.js"
></script>

<section id="isso-thread">
  <noscript>Javascript needs to be activated to view comments.</noscript>
</section>
In practice, I tried this and was immediately hit with a CORS error and a 404
error saying my browser couldn't retrieve embed.min.js from
comments.fd93.me. For once, this wasn't my fault; it turns out that
isso 0.13.2 suffers from incomplete packaging
due to the same setuptools change that caused problems earlier.
Following the sage advice of user mightykatun, I just reverted to version
0.13.0 and rebooted:
su isso
source /home/isso/isso/bin/activate
pip install isso==0.13.0
systemctl restart isso.service
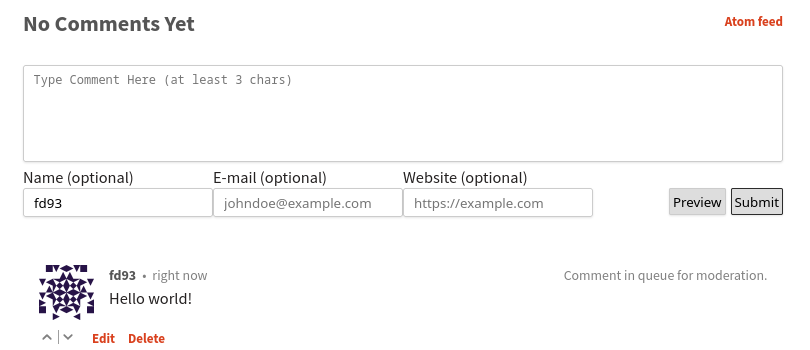
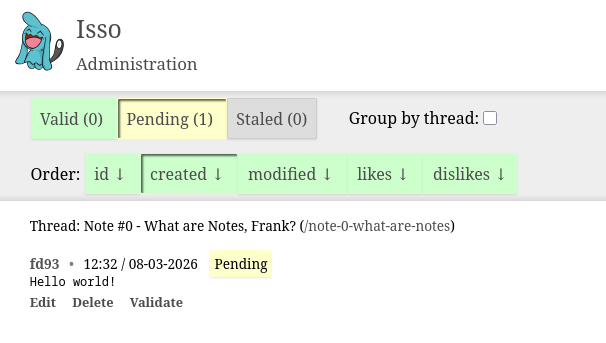
With this, the embed code Just Worked as intended: I could write a comment and see it show up in my moderation queue immediately.
Making it observable
Near the start of this article I loaded Chekhov's Gun of Observability. Actually, it was relatively easy for me to achieve this, because I already have a monitoring and alerting system running on my home server. This uses Uptime Kuma to send regular requests and Gotify to ping my phone if anything goes wrong.
I setup two monitors in Uptime Kuma. One just sends an ICMP ping to the Hetzner server once a minute and checks that it gets a response. This ensures the virtual machine is running. The other tests that Isso itself is running by regularly requesting the comments feed on a specific article. This also has the nice feature of checking the TLS certificate's expiry, so I can check renewal is working as intended.
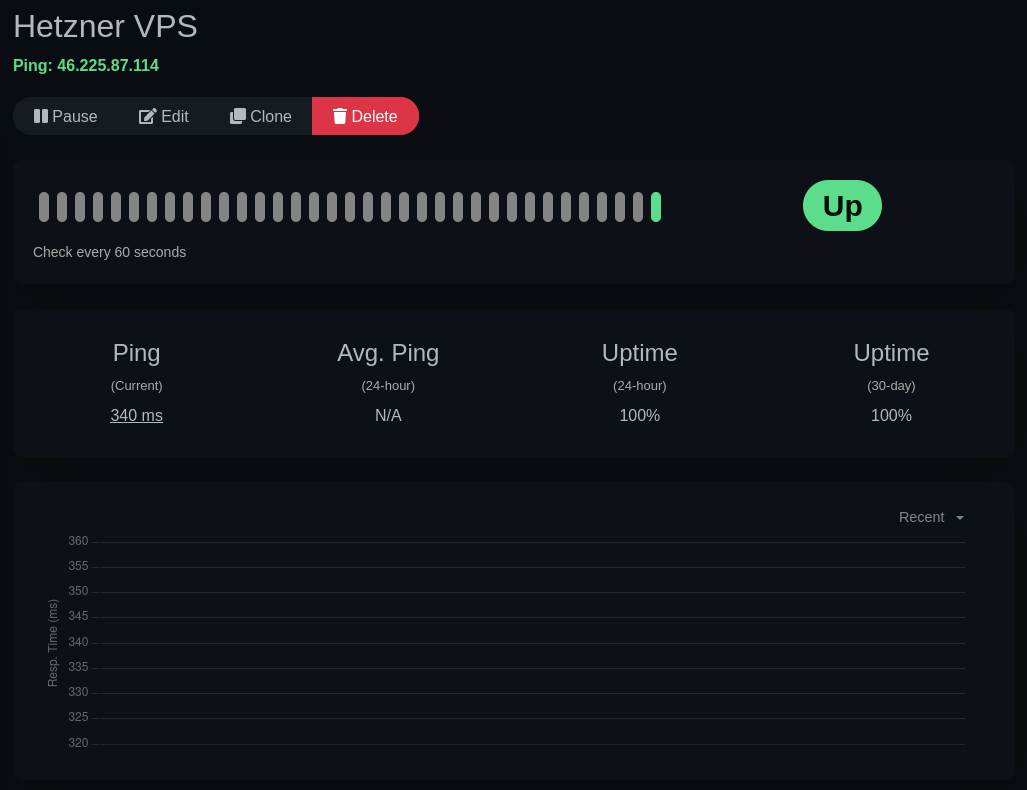
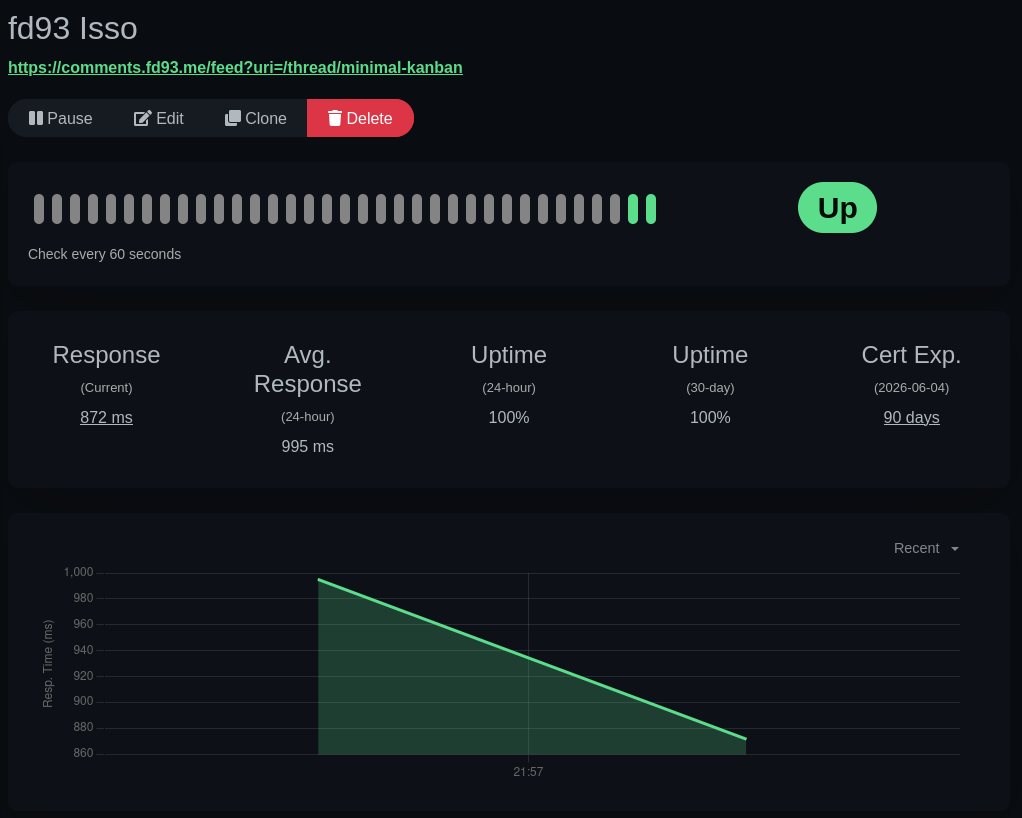
For now, this only gives me monitoring capabilities and I don't really have any ability to self-heal. Per my requirements, that doesn't really matter - this is just a comments server. But if I feel like it in the future, it will be pretty easy for me to setup Uptime Kuma to reboot my VPS via the Hetzner API.
Why is this article so long?
I wanted to illustrate the process of setting up a self-hosted instance of isso (or any web service) end-to-end. There are very few resources that summarize every step of the process required to run a web service from design to being ready for public consumption.
(That includes the types of failures and annoyances that I've documented, and that you only really get used to with experience.)
Since an increasing number of people are interested in self-hosting to protect their data and avoid paying for dozens of subscriptions, I thought writing this type of guide might be helpful. (Okay, technically this is not self-hosting but self-managed hosting, I know.)
The process for hosting almost any web service on a VPS (or home server) is basically the same as I described in the article:
- Find a VPS provider you're happy with and provision an instance.
- Set up a web server like Apache, Nginx, or Caddy to act as an entrypoint / reverse proxy. Make sure it's robust to failures: this nearly always means running it as a systemd unit.
- Get a TLS certificate for the domain names you're interested in using to host your service. Caddy and Certbot make this really simple. Configure your web server to use the certificates.
- Set up your service. Debug any issues with it. Configure your web server to point to it correctly. Use a production-ready server for the service if applicable. Make it robust to failures: unlike the web server, you can do this through many different methods. Popular ones include systemd units, process monitors like pm2, or using docker containers.
Happy hosting!